Kubernetes
This tutorial is part of the Cloud Expert Series.
Back to Cloud ExpertCategory: Advanced
Difficulty: 3 out of 5
Duration: 60 minutes
Find a mistake? Let us know the issue here.

Creating a Cluster
A Kubernetes Cluster consists of one or more controller nodes, and one or more worker nodes. A client (you) communicates with controller nodes using the Kubernetes API to spin up containers. The worker nodes runs these containers.
For production environments, it is strongly recommended to deploy a minimum of three controller nodes to ensure high availability and fault tolerance. The number of worker nodes in a production cluster should be determined based on the expected workload, resource requirements, and scalability needs. For non-production use cases such as testing or development, a minimal setup with a single controller node and a single worker node may be sufficient.
In this tutorial we start by creating a cluster consisting of one controller and one worker node.
Cluster templates
In Magnum, a COE Cluster is created from a Cluster Template. A Cluster Template allows you to specify various configuration options for the Cluster including:
- The Availability Zone
- The Kubernetes version
- The Nova Flavor size for the nodes in the cluster
- The number of nodes
As the number of configuration options can be overwhelming, Nectar provides
a few default templates to get you started quickly. These templates have names
of the form
kubernetes-<kubernetes_version>-<availability_zone>-<network_driver>-<template_version>,
and they can be listed by running:
openstack coe cluster template list
+--------------------------------------+-------------------------------------------------+------+
| uuid                                 | name                                            | tags |
+--------------------------------------+-------------------------------------------------+------+
| f8514751-74ff-41ec-8ed1-eac74efa16ad | kubernetes-v1.35.4-melbourne-qh2-calico-v2      | None |
| f24f0441-99e8-4e04-b9e4-cf41694b193d | kubernetes-v1.35.4-melbourne-qh2-uom-calico-v2  | None |
| bf5fd78d-00e9-4653-b272-3a6895f55f67 | kubernetes-v1.35.4-monash-01-calico-v2          | None |
| 9e7e4d5f-36e8-4ec3-a431-829ece1d8505 | kubernetes-v1.35.4-monash-02-calico-v2          | None |
| 78a50aeb-8f29-45a4-a67a-2bcc4a7ca257 | kubernetes-v1.35.4-intersect-calico-v2          | None |
| f8907566-991e-4c95-9424-333e084227d3 | kubernetes-v1.35.4-tasmania-calico-v2           | None |
| d4551810-14e3-40b5-b7c4-228adbac5595 | kubernetes-v1.35.4-tasmania-02-calico-v2        | None |
| 6cbed1da-387a-4a66-86ea-febc4cd05309 | kubernetes-v1.35.4-pawsey-calico-v2             | None |
| fbfa1751-568b-4fdc-abb3-65f7eaa3ca4c | kubernetes-v1.35.4-auckland-calico-v2           | None |
| 4bfd59a9-ebc5-4262-af4e-90776fa00284 | kubernetes-v1.35.4-QRIScloud-calico-v2          | None |
| 404b8699-a073-4557-b78b-440bd89a48fe | kubernetes-v1.35.4-swinburne-01-calico-v2       | None |
| 22b5eb02-124c-4c63-a0d8-85f710e105f9 | kubernetes-v1.35.4-ardc-syd-1-calico-v2         | None |
| acce71e7-707c-4159-90a6-aab6d737e5d1 | kubernetes-v1.35.4-adelaide-calico-v2           | None |
| 0981a825-0fa5-47a6-ae93-d1556943947b | kubernetes-v1.35.4-intersect-adelaide-calico-v2 | None |
| dc67fa21-3cc6-48fb-b1fa-775f9b675c74 | kubernetes-v1.36.1-melbourne-qh2-calico-v1      | None |
| 88eb1d8d-f2d5-411c-80b0-7888d40c86cd | kubernetes-v1.36.1-melbourne-qh2-cilium-v1      | None |
| 1c24185f-eebe-4f02-b9a4-2c12a504b42a | kubernetes-v1.36.1-melbourne-qh2-uom-calico-v1  | None |
| cb87fe8d-1bce-4397-8b62-934c445dec60 | kubernetes-v1.36.1-melbourne-qh2-uom-cilium-v1  | None |
| 30f07662-b88f-441e-b305-9a4e3d8341d6 | kubernetes-v1.36.1-monash-01-calico-v1          | None |
| 0d387543-be00-45f0-baa9-b896abb5d4fb | kubernetes-v1.36.1-monash-01-cilium-v1          | None |
| b436cdf7-d99a-40a2-84c8-13d3e2a4e328 | kubernetes-v1.36.1-monash-02-calico-v1          | None |
| 951f7357-58e7-4a8f-8480-d84be28d9819 | kubernetes-v1.36.1-monash-02-cilium-v1          | None |
| acb3d0d6-d760-4fbf-8285-d3c7ebcfd4b7 | kubernetes-v1.36.1-intersect-calico-v1          | None |
| b29bd4e0-6a0d-4601-8898-44f96e9397ad | kubernetes-v1.36.1-intersect-cilium-v1          | None |
| 03589480-cbb7-4e41-9b0f-4f221272ddd9 | kubernetes-v1.36.1-tasmania-calico-v1           | None |
| 7093457e-7df6-4ef8-8270-5835eb6cd163 | kubernetes-v1.36.1-tasmania-cilium-v1           | None |
| e8080acf-0845-4767-aaaa-02480d273d0d | kubernetes-v1.36.1-tasmania-02-calico-v1        | None |
| 6c132cbb-e360-422a-adbd-38eba1d68257 | kubernetes-v1.36.1-tasmania-02-cilium-v1        | None |
| 5894e5fc-1eaf-41bf-b47e-560db85129ce | kubernetes-v1.36.1-pawsey-calico-v1             | None |
| 6c2c40f7-d04a-46f8-b50e-cf569f2c674a | kubernetes-v1.36.1-pawsey-cilium-v1             | None |
| 84cd680a-69c4-44ac-b6f1-111cad477d4e | kubernetes-v1.36.1-auckland-calico-v1           | None |
| 60b5cf16-e85b-4f72-ad08-7434a2ac2f10 | kubernetes-v1.36.1-auckland-cilium-v1           | None |
| 96ef7b81-60d5-4b3d-9d58-442971776d06 | kubernetes-v1.36.1-QRIScloud-calico-v1          | None |
| 972a429d-aac4-49b9-9bf1-43b8f171f73e | kubernetes-v1.36.1-QRIScloud-cilium-v1          | None |
| 1fe6c5ce-d340-4572-95b1-b5d7ced0103a | kubernetes-v1.36.1-swinburne-01-calico-v1       | None |
| c43168f3-d43e-4aad-b362-88ce2f22d3df | kubernetes-v1.36.1-swinburne-01-cilium-v1       | None |
| 06adfefb-2577-4262-b297-0f431f168551 | kubernetes-v1.36.1-ardc-syd-1-calico-v1         | None |
| ac992370-5c37-476e-a1b1-c345c613a91b | kubernetes-v1.36.1-ardc-syd-1-cilium-v1         | None |
| 1022b8b1-9379-484f-8c8a-cd299c2e22ea | kubernetes-v1.36.1-adelaide-calico-v1           | None |
| 2a8459bb-706e-4c2e-8b7a-d2554c622653 | kubernetes-v1.36.1-adelaide-cilium-v1           | None |
| 844d9c3a-e2a5-46da-ae35-770a2c197be1 | kubernetes-v1.36.1-intersect-adelaide-calico-v1 | None |
| d9816d75-d379-4f53-9ac3-5ab53c18d00c | kubernetes-v1.36.1-intersect-adelaide-cilium-v1 | None |
+--------------------------------------+-------------------------------------------------+------+
Cluster template details
Templates are in the format
kubernetes-<kubernetes_version>-<availability_zone>-<network_driver>-<template_version>.
Here are more details on what each part of the name means.
kubernetes_version - Nectar will provide at least one template per Kubernetes minor version.
availability_zone - Nectar will provide defaults for each availability zone. This includes:
- DNS servers
- CIDR for nodes to reduce clashes in RFC1918 addresses for each institution
network_driver - The Container Network Interface (CNI) plugin used for pod
networking within the cluster. Nectar provides templates using either
Calico or
Cilium. If you are unsure which to choose, Cilium is a
safe default.
template_version - Nectar may occasionally update Glance images or
supporting software that is preinstalled for a cluster. When this happens,
Nectar will push out a new cluster template version.
openstack coe cluster template show 22b5eb02-124c-4c63-a0d8-85f710e105f9 --max-width 132
+-----------------------+----------------------------------------------------------------------------------------------------------+
| Field                 | Value                                                                                                    |
+-----------------------+----------------------------------------------------------------------------------------------------------+
| insecure_registry     | -                                                                                                        |
| labels                | {'container_infra_prefix': 'registry.rc.nectar.org.au/nectarmagnum/', 'availability_zone': 'ardc-syd-1', |
|                       | 'control_plane_availability_zone': 'ardc-syd-1', 'csi_cinder_availability_zone': 'ardc-syd-1',           |
|                       | 'octavia_provider': 'ovn', 'octavia_lb_algorithm': 'SOURCE_IP_PORT', 'capi_helm_chart_version':          |
|                       | '0.22.0-nectar.2', 'upgrade_targets': '06adfefb-2577-4262-b297-0f431f168551'}                            |
| updated_at            | 2026-07-01T04:07:03+00:00                                                                                |
| floating_ip_enabled   | False                                                                                                    |
| fixed_subnet          | -                                                                                                        |
| master_flavor_id      | m3.small                                                                                                 |
| uuid                  | 22b5eb02-124c-4c63-a0d8-85f710e105f9                                                                     |
| no_proxy              | -                                                                                                        |
| https_proxy           | -                                                                                                        |
| tls_disabled          | False                                                                                                    |
| keypair_id            | -                                                                                                        |
| public                | True                                                                                                     |
| http_proxy            | -                                                                                                        |
| docker_volume_size    | -                                                                                                        |
| server_type           | vm                                                                                                       |
| external_network_id   | ardc-syd                                                                                                 |
| cluster_distro        | ubuntu                                                                                                   |
| image_id              | 7db23d42-5246-4b61-a667-696bb4aa9010                                                                     |
| volume_driver         | -                                                                                                        |
| registry_enabled      | False                                                                                                    |
| docker_storage_driver | overlay2                                                                                                 |
| apiserver_port        | -                                                                                                        |
| name                  | kubernetes-v1.35.4-ardc-syd-1-calico-v2                                                                  |
| created_at            | 2026-05-06T23:59:05+00:00                                                                                |
| network_driver        | calico                                                                                                   |
| fixed_network         | -                                                                                                        |
| coe                   | kubernetes                                                                                               |
| flavor_id             | m3.small                                                                                                 |
| master_lb_enabled     | True                                                                                                     |
| dns_nameserver        | 202.158.207.1,202.158.207.2                                                                              |
| project_id            | 1                                                                                                        |
| hidden                | False                                                                                                    |
| tags                  | -                                                                                                        |
+-----------------------+----------------------------------------------------------------------------------------------------------+
You can create your own templates with custom options. Use openstack coe
cluster template show <id> on one of the default templates to see the
template options that are appropriate to the AZ that you intend to use. We
strongly recommend that you copy all properties and values from the latest
version of the default template, apart from those that you specifically
want to change.
Create a Cluster using the command line
Using the openstack command line client
-
Choose a Cluster Template to create your Cluster from.
-
Create the Cluster. Note, we are using the
uuidof thekubernetes-v1.35.4-ardc-syd-1-calico-v2template from our cluster template list as the value for our template, and you need to input the name of your ownkeypair.openstack coe cluster create --cluster-template 22b5eb02-124c-4c63-a0d8-85f710e105f9 mycluster Request to create cluster 7f4a506e-6d6a-4713-9d35-917d3e33096f accepted -
List the clusters in your project, and wait for your cluster to reach the
CREATE_COMPLETEstatus. This could take up to 15 minutes.openstack coe cluster list +--------------------------------------+----------------------+----------------+------------+--------------+-----------------+---------------+ | uuid | name | keypair | node_count | master_count | status | health_status | +--------------------------------------+----------------------+----------------+------------+--------------+-----------------+---------------+ | 7f4a506e-6d6a-4713-9d35-917d3e33096f | mycluster | | 1 | 1 | CREATE_COMPLETE | HEALTHY | +--------------------------------------+----------------------+----------------+------------+--------------+-----------------+---------------+
Create a Cluster using the Nectar Dashboard
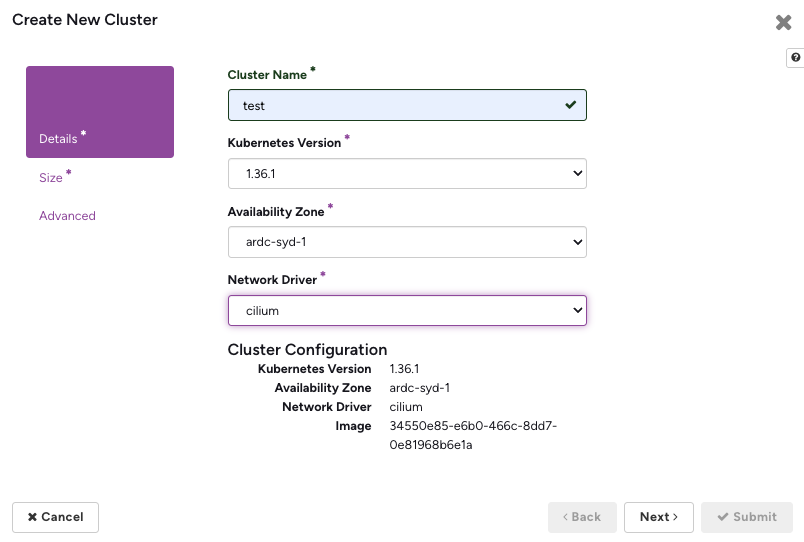
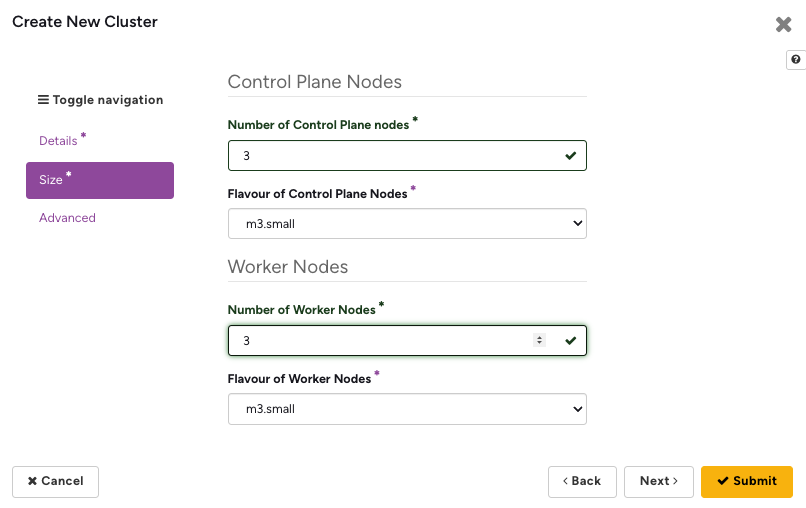
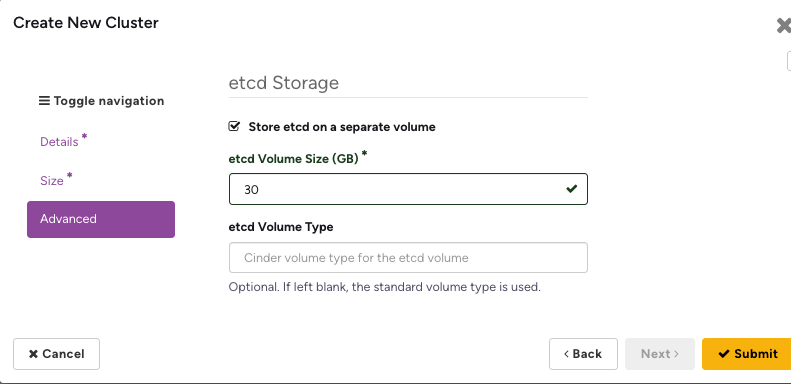
As an alternative to the command line, you can create a cluster from the Nectar Dashboard. Go to Project > Container Infra > Clusters and click + Create Cluster. The dialog walks you through three steps.
-
Details. Enter a name for your cluster, then select the Kubernetes version, the availability zone and the network driver. As you make your selections, the Cluster Configuration summary shows the cluster template that will be used.
-
Size. Choose the number of control plane nodes and worker nodes, and a flavour for each. For production clusters we recommend three control plane nodes. For testing, one control plane node and one worker node is sufficient.
-
Advanced. Optionally store etcd on a separate Cinder volume by ticking Store etcd on a separate volume and setting a volume size. If the volume type is left blank, the standard volume type is used. Click Submit to create the cluster.
Your new cluster will appear in the Clusters list. Wait for its status to
reach CREATE_COMPLETE. This could take up to 15 minutes.
Not recommended for Production
This example uses your personal credentials, which may not be desirable in a
production cluster. This cluster will not have valid credentials to create new
resources like Volumes when the creator leaves the project. To prevent this
from happening, you should use a Robot
account.