Creating a keypair for use in Nectar
This tutorial is part of the Cloud Starter Series.
Back to Cloud StarterCategory: Beginner
Difficulty: 1 out of 5
Duration: 16 minutes
Find a mistake? Let us know the issue here.

ssh-keygen method
Another way to generate a keypair is to use the ssh-keygen command using the Command Line. You then need to import your Public Key into Nectar for Nectar use.
Note
For Windows users, you can use Powershell, for Mac users Terminal.
Generating your keypair
-
You can generate the key with the command below. This will run the
keygencommand with the default options.$ ssh-keygenssh-keygenwill ask you these questions. You can use the default filename, which isid_rsa(i.e./home/<user>/.ssh/id_rsa) or type your own. Accept the default options by pressing the enter key, and for the purpose of this tutorial you can enter an empty passphrase.Enter file in which to save the key (/home/<user>/.ssh/id_rsa): Enter passphrase (empty for no passphrase): Enter same passphrase again:For the purpose of this tutorial you can enter an empty passphrase.
ssh-keygengenerates a pair of keys in the directory.ssh.overwrite? (y/n)
If a file with the default key name already exists,ssh-keygenwill warn you before overwriting. You should not overwrite any existing keys, unless you are absolutely certain it is not in use. Better to choose a different name. -
Verify that you have the files of your key pair:
$ ls ~/.ssh/
id_rsa  id_rsa.pub
The first command
ls, is used to list the contents of a particular location. In this case we have asked for the .ssh folder contents, which includes our keys.
A key pair is just a pair of text files. You can view the contents of your key files with any text editor.
Importing your Public Key into Nectar
To use your key pair with Nectar you need to Import your public key (id_rsa.pub in the example above) into Nectar. .pub is the file extension for your public key.
Important
Make sure you import your public key here, not the private one
- in your Nectar dashboard, navigate to
Compute | Keypairs - Click the
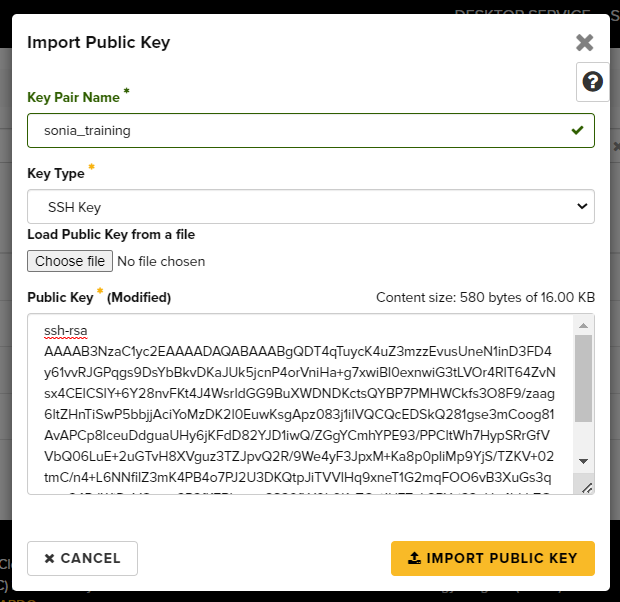
Import Public Keybutton - In the
Import Public Keydialog,- give your public key a Key Pair Name (this name doesn’t need to match your key’s filename or the label. You should choose a name that helps you stay meaningfully organised.)
- Select SSH Key for Key Type
- Load your public key from your public key file (
sonia_training.pubin the screenshot), using the Choose File button and dialog or - Paste the text of your public key in the Public Key field.
The completed Import Public Key Dialog should look something like this
- Click the
Import Public Keybutton
The name of your key should now be listed in the Key Pairs page on your Nectar Dashboard.