Access using SSH and VNC
This tutorial is part of the Cloud Starter Series.
Back to Cloud StarterCategory: Beginner
Difficulty: 1 out of 5
Duration: 17 minutes
Find a mistake? Let us know the issue here.

Terminal and ssh
To connect to your instance you need an ssh client, accessible from your terminal using the ssh command. You need to pass three pieces of information to the ssh command:
- The remote computer’s address
- User account name
- Private key
Address
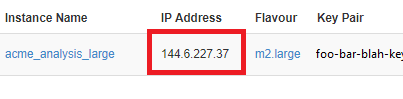
When you launched your instance, Nectar gave you an IP address. In the example below the IP Address of the instance named acme_analysis_large is 144.6.227.37. You should find and note the IP Address of your instance now.
Note
If using the QCIF Availability Zone, you will have two IP addresses, one that says QLD and the other QLD data. The QLD data network is to allow an instance to access QRIScloud’s RDS collections. Only instances which are permitted to access these collections need to configure and use the QLD data IP Address. A typical Virtual Machine setup does not need to use this, only the QLD IP address is required.
User account
When you launched your instance, you chose an Image. Nectar images have all been preconfigured with a default user account. In our example we launched a Ubuntu image, which has been preconfigured with the user account ubuntu. Note that the Nectar-provided default user accounts are configured to have administrator privileges, so connecting with this account gives you complete control over the VM.
More information about images and preconfigured default user accounts can be found in our Image Catalog
Keypair
When you launched your instance you chose a keypair from the registered keypairs in your Nectar account. Nectar has now applied the public key of that pair to the default user account on the instance. This means that you can connect to this account, on this instance by specifying the file location of the private key of that pair. You should remind yourself of the private and secure location where your private key is stored now.
Cloud Starters
In the tutorial Creating a keypair for use in Nectar you have created or downloaded your Private Key. The recommended location is the .ssh directory in your home directory, i.e. ~/.ssh
Connection
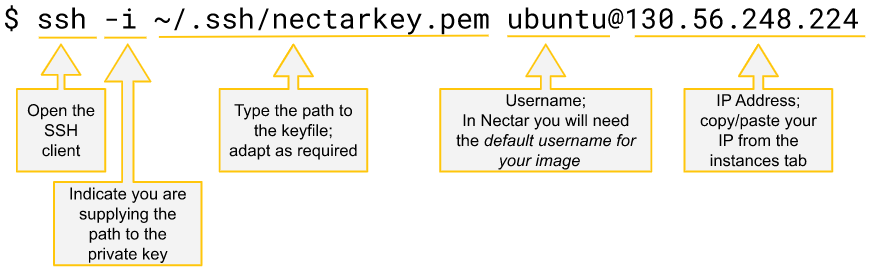
Below is the SSH command for our example. You should adjust it for the account and IP address for your instance.
$ ssh ubuntu@144.6.227.37
If you have used a non-standard name or location for your private key, you must specify this to the ssh command using the -i-argument. Our recommendation is for your key to be named ~/.ssh/id_rsa so you don’t have to do that, but if you insist:
$ ssh -i /path/to/my/non-standard-key-name ubuntu@144.6.227.37
Or if you like diagrams with arrows:
Authenticity warning
When you first connect to an instance (i.e. the host), your local SSH software does not know of that host. SSH warns you that it can’t establish the host’s authenticity. If you’ve just launched your instance, and you’re sure that the details are correct, you can answer “yes” to this prompt. SSH will now record that this is a known host that you agree to connect to, and won’t bother you with this warning again.
local-prompt:~$ ssh ubuntu@144.6.227.37
The authenticity of host '144.6.227.37 (144.6.227.37)' can't be established.
ECDSA key fingerprint is SHA256:x1iQRugzRuabgCbD4WOCVvZycpgkagQZsOkLKHdFdtE.
Are you sure you want to continue connecting (yes/no)? yes
Warning: Permanently added '144.6.227.37' (ECDSA) to the list of known hosts.
remote-prompt:~$
Authenticity Warning
If you receive a similar authenticity warning when it’s not your first connection then SSH is telling you that something about your instance has materially changed. There is a variety of reasons that this can happen, most (but not all) of them benign. You can read more about this in the Nectar Knowledge base article troubleshooting ssh access
You should now have a connection to your instance. Notice that the command prompt has subtly changed to indicate what machine and account it is representing, e.g.:
wile@acme-laptop:~$ ssh -i .ssh/wileskey ubuntu@144.6.227.37
Last login: Mon Jul 29 16:22:13 2019 from 131.217.255.76
ubuntu@acme-analysis-large:~$
You can disconnect from the remote computer using the logout command. E.g.
ubuntu@acme-analysis-large:~$ logout
Connection to 144.6.227.37 closed.
wile@acme-laptop:~$